What Is A Die-line in Printing?
2026-03-01 15:34:54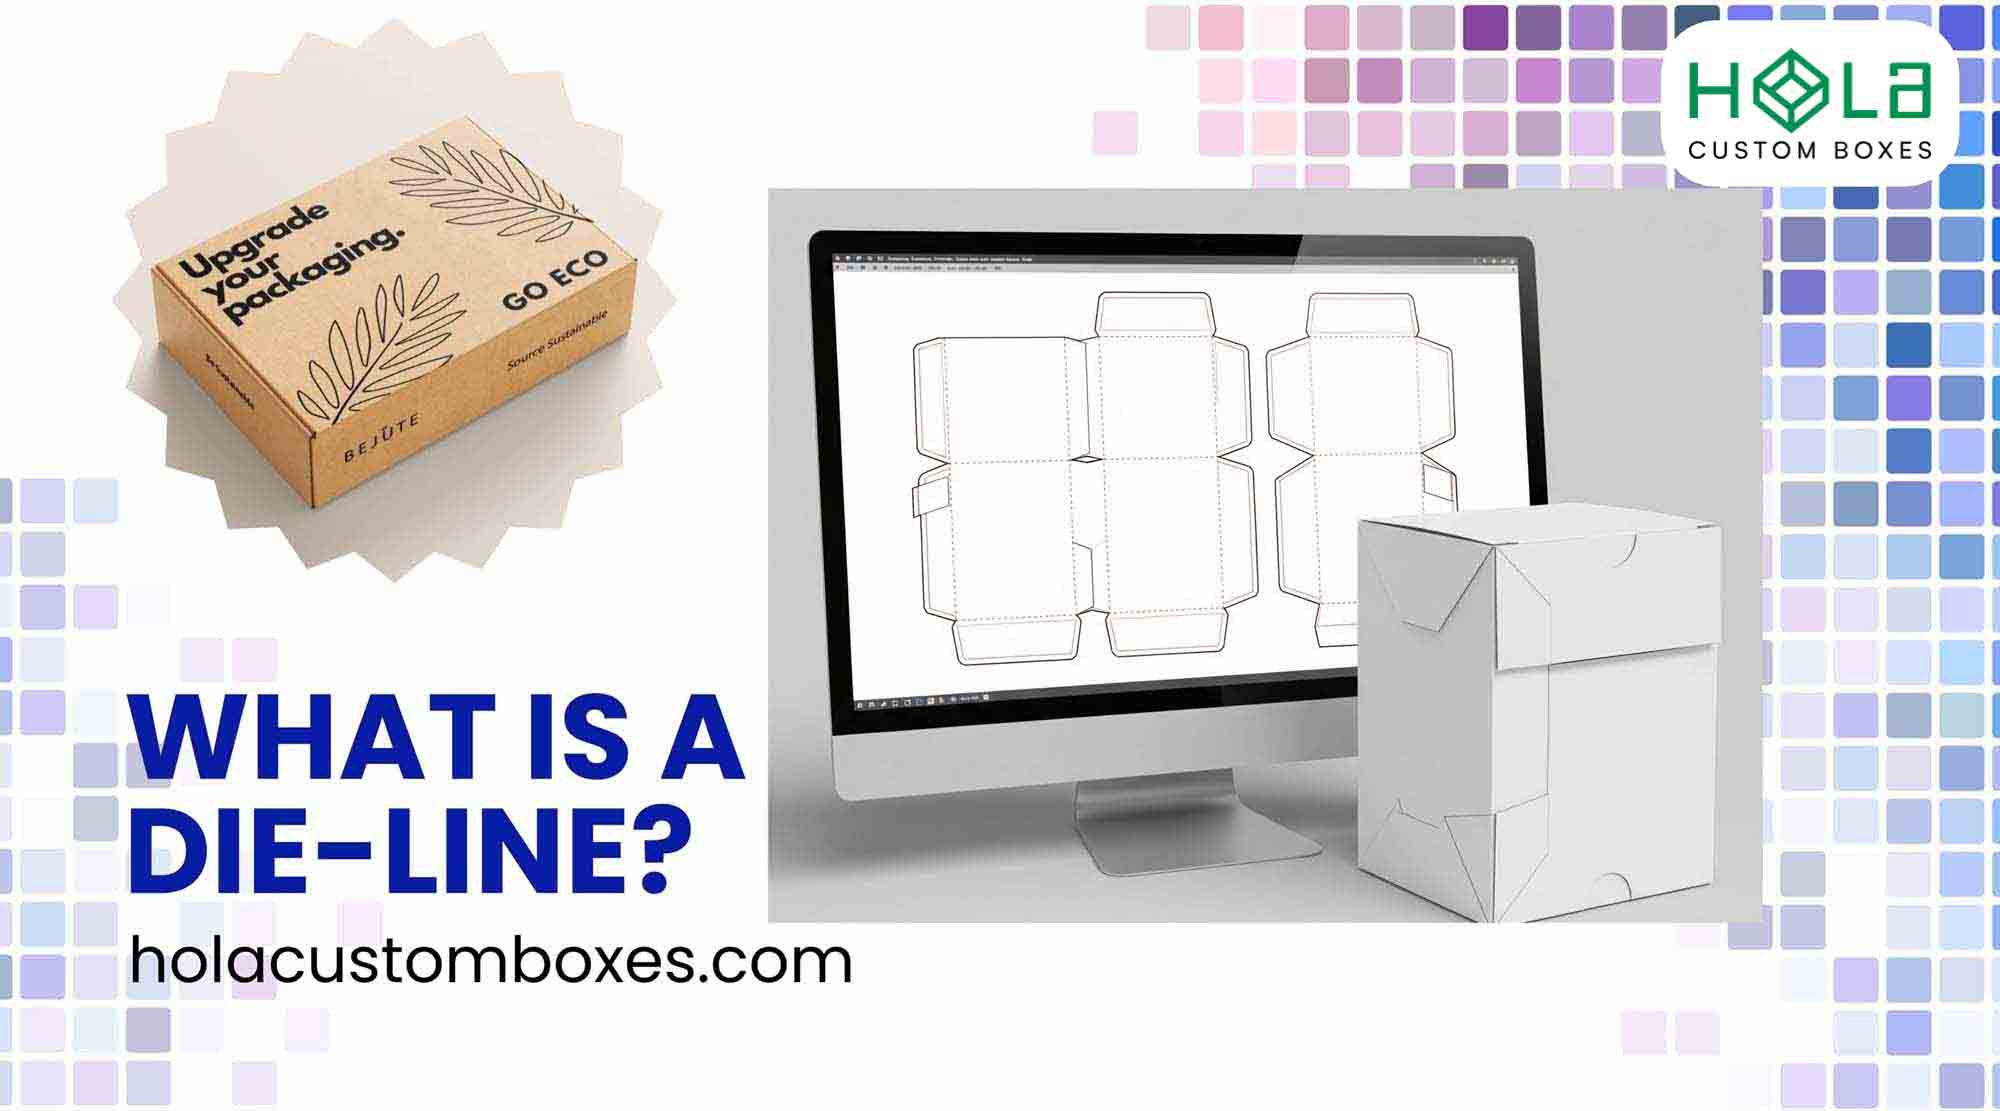
What Is a Dieline in Printing?
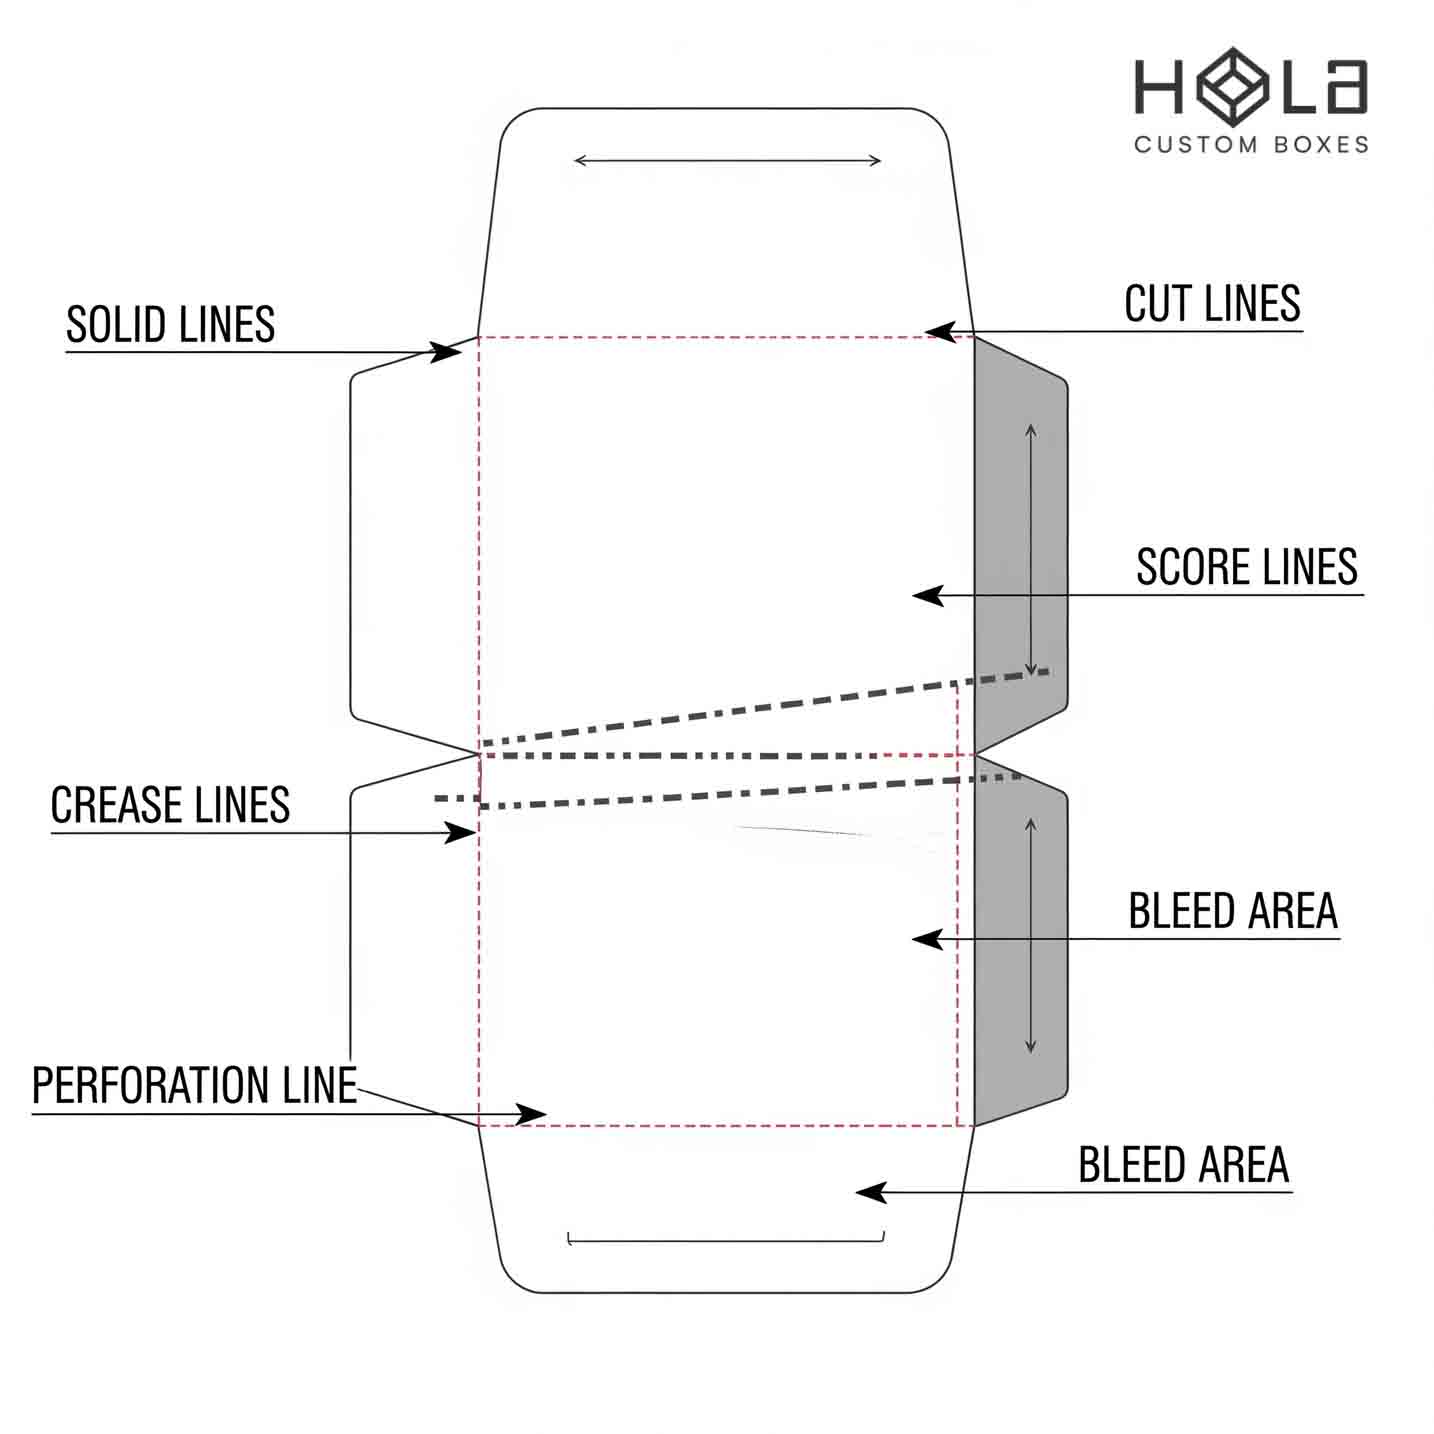
A dieline is your print-ready blueprint that maps every cut, fold, perforation, bleed, and safe zone so packaging and labels trim and assemble as intended. You set solid cut paths, dashed folds, dotted perforations, light-blue bleed, dark-blue safety, and yellow glue tabs. Build it in CMYK, align dimensions, and hard-proof at 100% to catch shifts. Convert text to outlines, lock layers, and export a flattened PDF with spot-color lines. Next, you’ll see how to create one step by step.
Main Points
- A dieline is a precise template that maps where packaging is cut, folded, and perforated during printing and finishing.
- It uses distinct line types and colors to indicate cuts, folds, bleeds, safety margins, and glue areas.
- Dielines ensure the final package matches design intent, preventing shifts, cropping, and misaligned artwork.
- Designers create dielines with printer input to validate structure, clearances, materials, and manufacturing tolerances.
- Print-ready dielines are delivered as flattened PDFs with spot-color lines, bleeds, and outlined text for production accuracy.
Why Dielines Matter in Packaging and Print
Before you send a package to press, a dieline gives you a precise blueprint that dictates every cut, fold, and perforation, so the finished piece matches your design.
You use a Dieline to lock in correct layout before production, aligning cut lines, folding marks, and bleed with your packaging design. It standardizes dimensions across printing and packaging runs, preserving brand consistency.
Once your dieline is set, choose a structure from retail packaging boxes for standard on-shelf cartons
By mapping visual elements—logos, copy, barcodes—you prevent shifts and cropping. Clear annotations streamline manufacturing handoffs, reducing misreads and rework.
Map logos, copy, and barcodes to prevent shifts; clear annotations cut misreads and rework.
Fewer errors mean faster approvals, cleaner cuts, and predictable costs. In short, a solid dieline turns intent into repeatable, on-spec output.
This meticulous setup complements our quality assurance process, helping ensure durable, on-spec packaging that arrives safely and consistently across production runs.
Key Components of a Dieline
You’ve seen how a solid dieline turns intent into on-spec output; now break it into the parts you’ll set up and check.
In the printing industry, a dieline is a template you’ll reference while creating dielines and preflighting files. Define cut lines as solid paths—everything outside gets removed.
Map fold lines in red to control panel geometry. Add bleed lines in light blue, extending artwork past cuts. Set safety lines in dark blue to protect text and logos.
Mark glue tabs in yellow, confirming adhesive zones. Label each layer, lock colors, verify overprints, then export vector outlines for production.
Premium projects translate the dieline into custom rigid gift packaging boxes with foil/emboss.
Who Creates Dielines and When to Involve Them
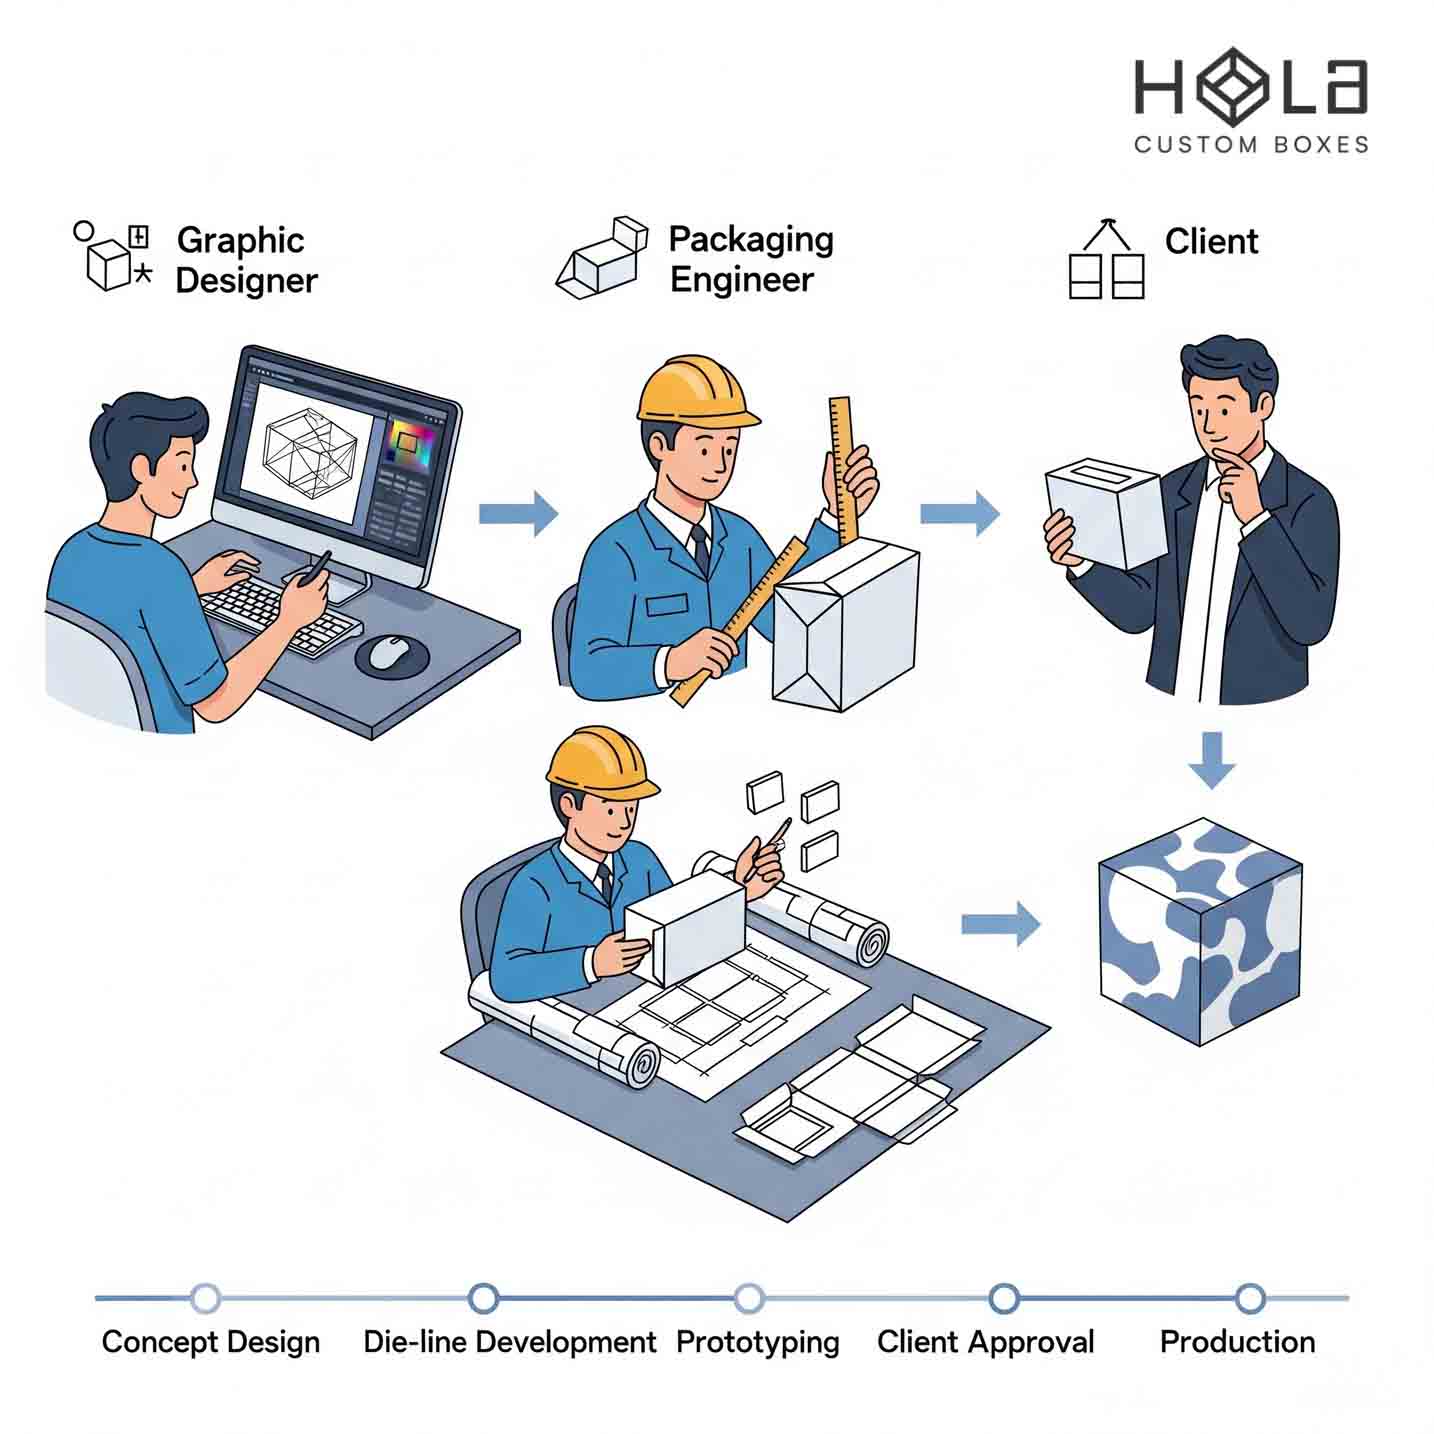
Although dielines can come from several places, you’ll usually rely on a packaging designer to build them, with support from a printer or die cutter who knows the manufacturing constraints.
Engage your design team early; the dieline is usually created using initial concept dimensions, mockups, and tolerance checks to avoid costly revisions.
- Bring in packaging designers at brief kickoff to align structure, branding, and product fit.
- Loop the printing company in during layout to inject manufacturing expertise and substrate realities.
- Validate folds, glue areas, and clearances before locking artwork to streamline the production process.
- Conduct preflight with all parties to fix errors before tooling.
Eco brands adapt dielines to custom printed kraft packaging boxes for sustainability.
Step-By-Step: Building a Dieline From Scratch
With your designer and printer aligned, start the build by fixing the target dimensions. Measure an existing package or sketch to size your dieline for packaging.
In graphic design software, set CMYK for printing accuracy and build vector paths. Define cutting lines (solid), each fold line (dashed), and perforations (dotted). Add bleed, safety, and glue tabs with clear annotations and separate layers. For enhanced presentation and protection, consider specifying specialty finishes like gloss, matte, foiling, or spot UV within your dieline notes.
Lay out panels square, verify panel-to-depth math, and note orientation for custom boxes. Print a hard proof at 100%. Test folds, check alignment, and confirm glue overlap.
Correct issues, then create the final labeled file and approve before going into production.
Creating Dielines in Adobe Illustrator

Before drawing a single line, set up Illustrator for print accuracy. In Adobe Illustrator, create a CMYK document; packaging lives in print, not RGB.
Build the Dieline in Printing on a separate layer above artwork. With design software like Adobe, use Pen/Shape tools to map cutting, fold, and perforation paths—solid strokes for cutting, dashed for folds, dotted for perforations.
Add bleed, safety, and glue tabs precisely.
- Define swatches: Cut=100% Magenta, Fold=Cyan dashed, Perf=Black dotted
- Lock artwork; edit dieline only
- Align to pixel grid off; snap to point on
- Save vector AI and flattened PDF for the final product and die cutting
Common Mistakes and How to Proof Your Dieline
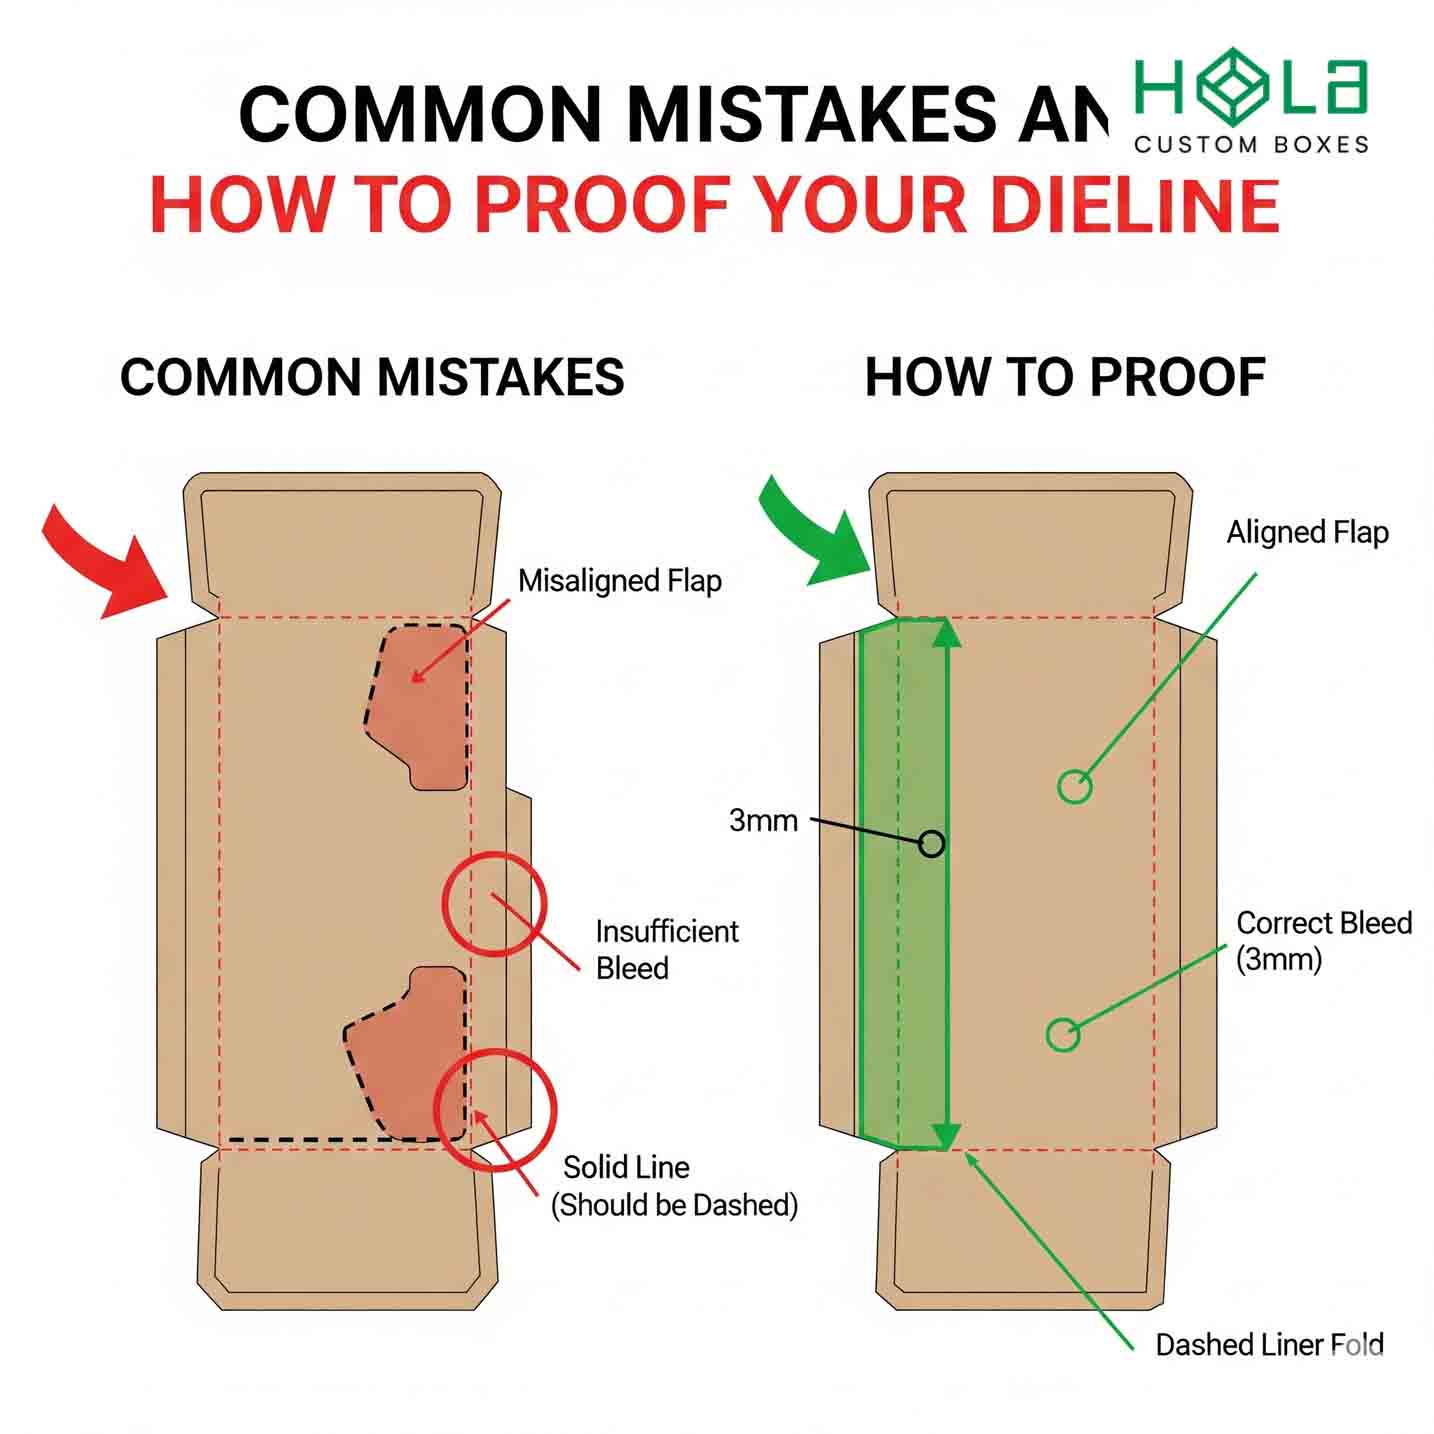
Even when your artwork looks perfect on-screen, small setup errors in the dieline can derail production, so audit it methodically.
Start by verifying measurements against a physical reference; misalignment stems from millimeter drift. In your design tool, set CMYK before placing art to avoid color shifts.
Add bleed lines that extend past trim, and confirm safety lines keep copy and logos clear of cuts and folds. Label cut, crease, and perforation layers distinctly.
Print a hard copy at 100% to proof panel fit, wrap, and glue areas. Fold, trim, and tape the mockup; note tensions, panel collisions, and registration.
Need help converting artwork to a dieline? Start with our retail packaging collection.
From Dieline to Production: Handoff and File Prep
Your proofed dieline now needs a clean handoff so production reads it without guesswork.
Export a print-ready, flattened PDF for file prep, locking layers and preserving color profiles. Include bleed, trim, cut lines, and fold lines as spot colors with clear naming. Convert text to outlines and rasterize linked art as needed to protect print quality across packaging substrates. As part of our customer-centric approach at Hola Custom Boxes, we support eco-conscious packaging by utilizing eco-friendly materials during production.
Export a flattened, color-true PDF with labeled spot-line marks; outline text and rasterize linked art.
Collaborate with your printer on tolerances, materials, and finishing.
- Provide a packaged folder: PDF, native file, fonts, profiles
- Label panels, orientations, and dimensions
- Note coatings, varnish, and dieline tolerances
- Run verification: mockups or a physical prototype before production
Frequently Asked Questions
What Is a Printer Dieline?
A printer dieline is your template for cutting, folding, and assembling printed packaging.
You choose printer dieline types, plan dieline layout techniques, and follow dieline color guidelines (spot colors, non-printing layers).
Use dieline software options like Illustrator or CAD tools, export correct dieline file formats (PDF, AI, DXF), and apply dieline design tips to align artwork.
Map the dieline printing process, run proofs, and perform dieline error prevention checks to avoid misalignments.
What Is a Dieline Used For?
You use a dieline to guide cutting, folding, and perforating so packaging prints and assembles correctly.
Emphasize dieline importance by aligning artwork to dieline specifications and dieline colors (e.g., magenta cuts, cyan folds).
Start dieline creation in dieline software, apply precise dieline design, and test prototypes.
Compare dieline examples, then make dieline adjustments for tolerance, bleed, and glue areas.
Finalize layers, lock vectors, and share a print-ready file.
What Is the Difference Between Dieline and Template?
A dieline differs from a template by function and precision. You use a dieline definition to map cut, fold, glue, bleed, and safety areas for print production. It drives the printing process and requires manufacturer alignment.
Template characteristics guide creative design layout and template usage, not structure. Follow design guidelines: build dielines in vector, review dieline examples, test assembly, then place artwork within templates.
Keep jargon clear to guarantee accurate, efficient production.
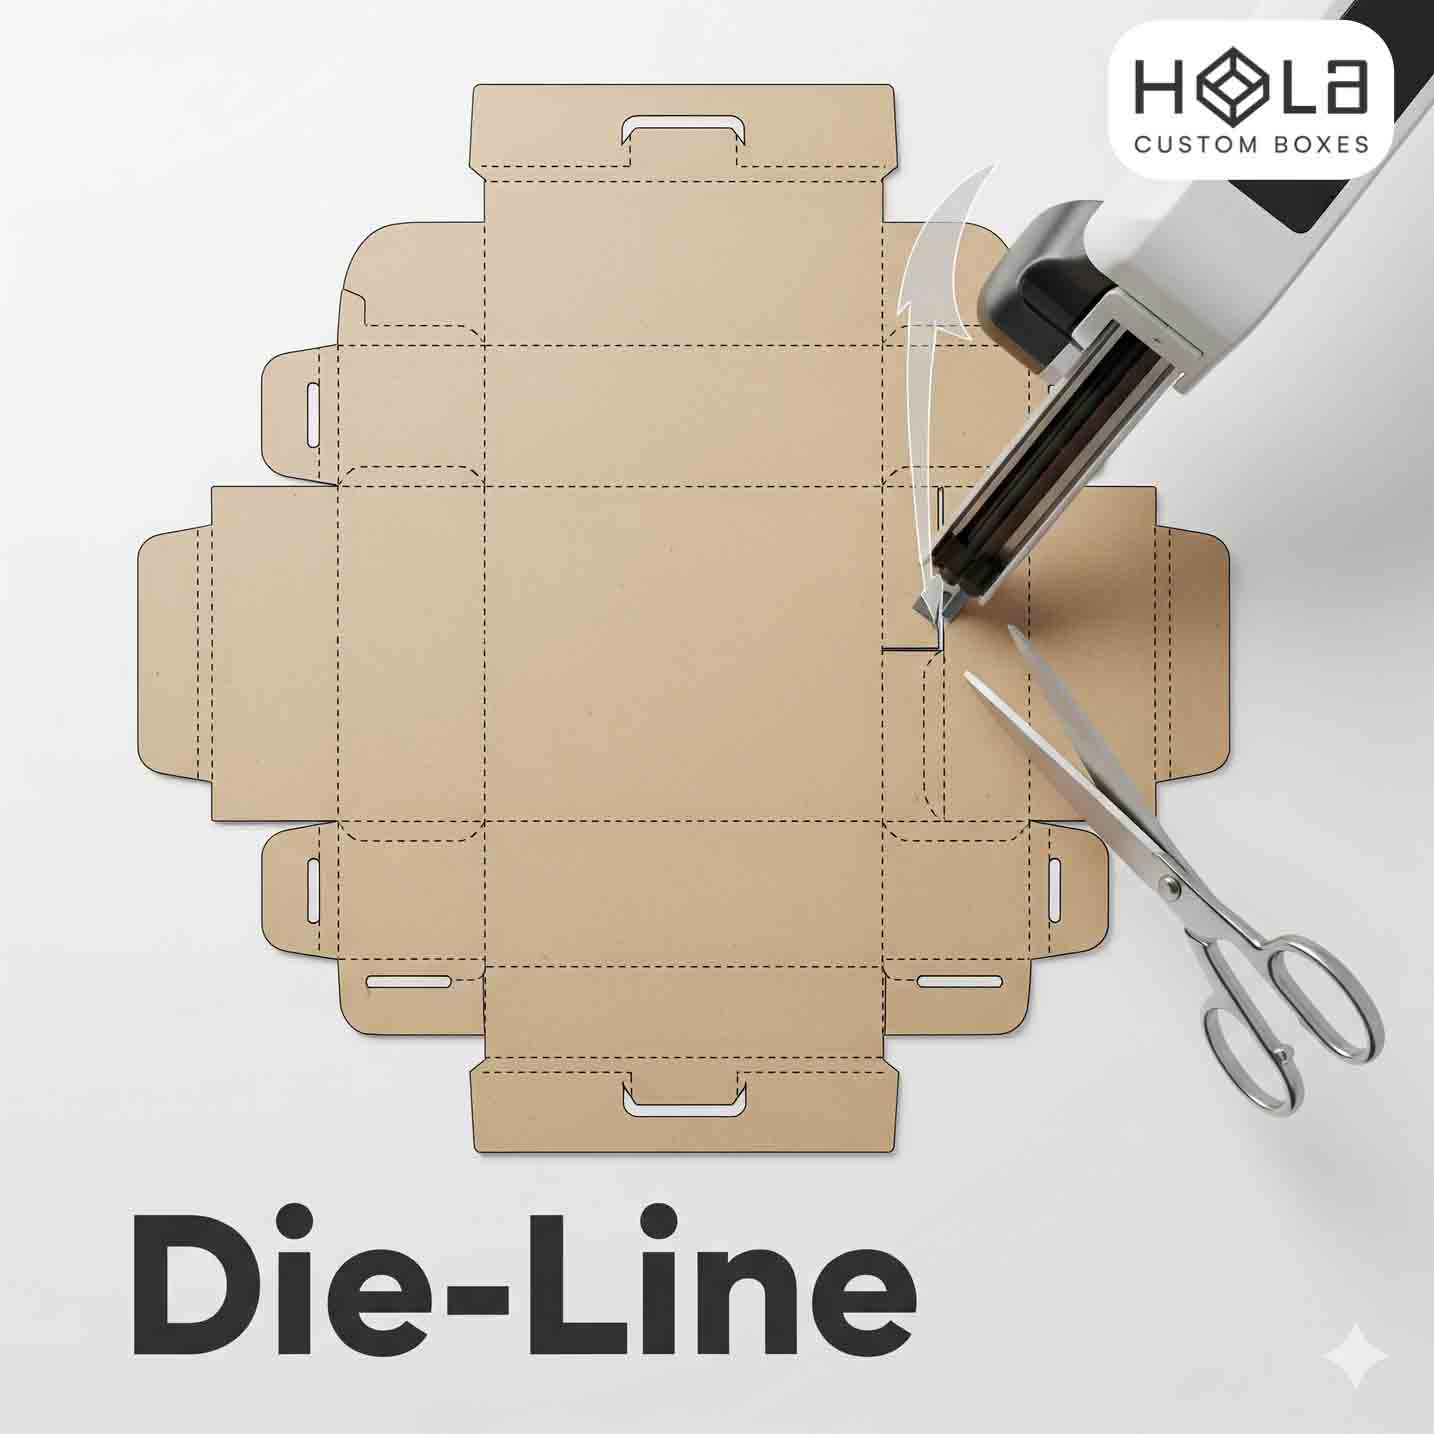
What Does a Dieline Look Like?
It looks like a flat, vector map of your package. You’ll see solid cut lines, dashed folds, dotted perforations, safety margins, and yellow glue tabs.
You build dieline design in dieline software, layer it above art, and label dieline color clearly. Check dieline dimensions, add notes, and proof paths.
Review dieline examples, then iterate. Prioritize dieline accuracy during dieline creation—it guarantees fit, clean trims, and underscores dieline importance in production.
(Recommended Products)